Why OAuth 2.0
OAuth 2.0 is a popular way for apps to access parts of your account on services like Google, Facebook, GitHub, and DigitalOcean, without ever seeing your password. You give an app specific permissions, and it uses those to act for you. In this article, I’ll explain the main ideas behind OAuth 2.0: the roles, the different types of grants, and the steps for each one.
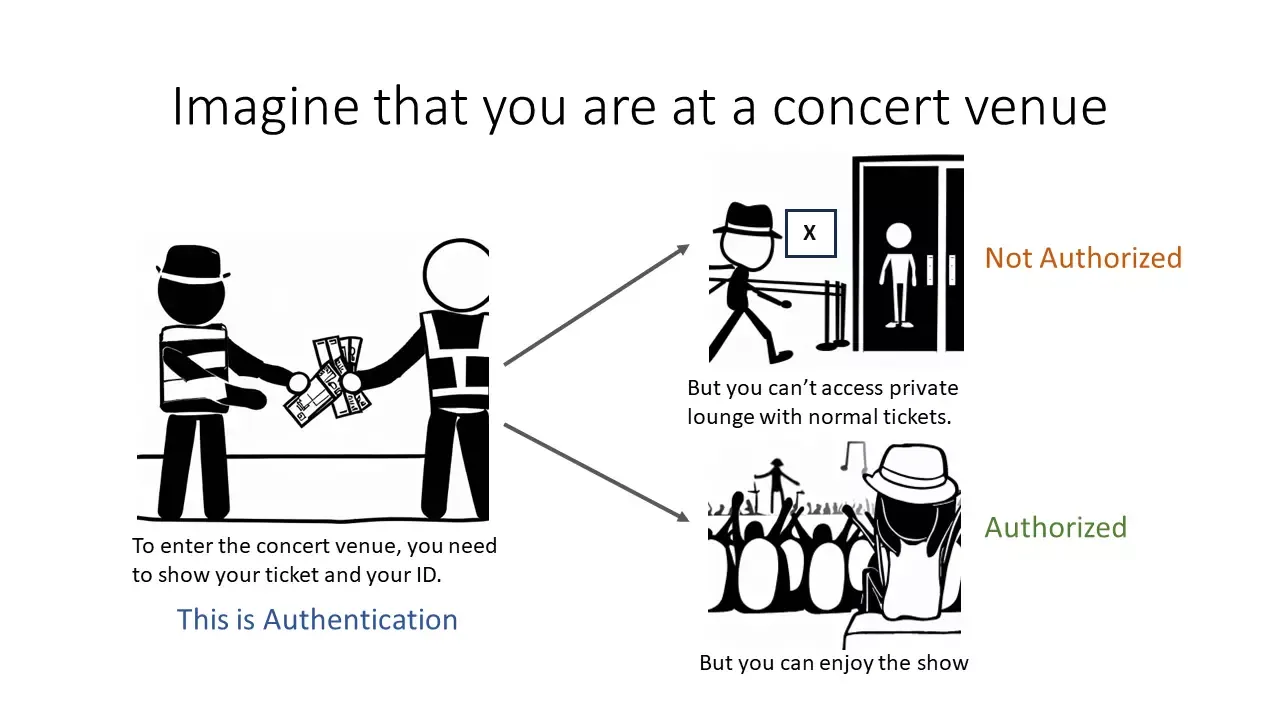
Before we go further, let’s clear up two terms that often get mixed up: authentication and authorization. Authentication checks who you are. For example, when you log in to your online bank with your username and password, you’re proving your identity. Authorization is about what you can do after that. Once you’re logged in, you can check your balance or pay bills, but you can’t see someone else’s account or change the bank’s rules.
Authentication asks, “Who are you?” Authorization asks, “What can you do?” They’re connected, but not the same. You need to be authenticated before you can be authorized, but not the other way around. You might be logged in but not allowed to do certain things, but you can’t get permission to do something unless you’ve logged in first.
OAuth 2.0 Roles
OAuth 2.0 has four main roles, each with its own job in the authorization process. Knowing what each one does helps you understand how the whole system works and how it fits different types of apps.
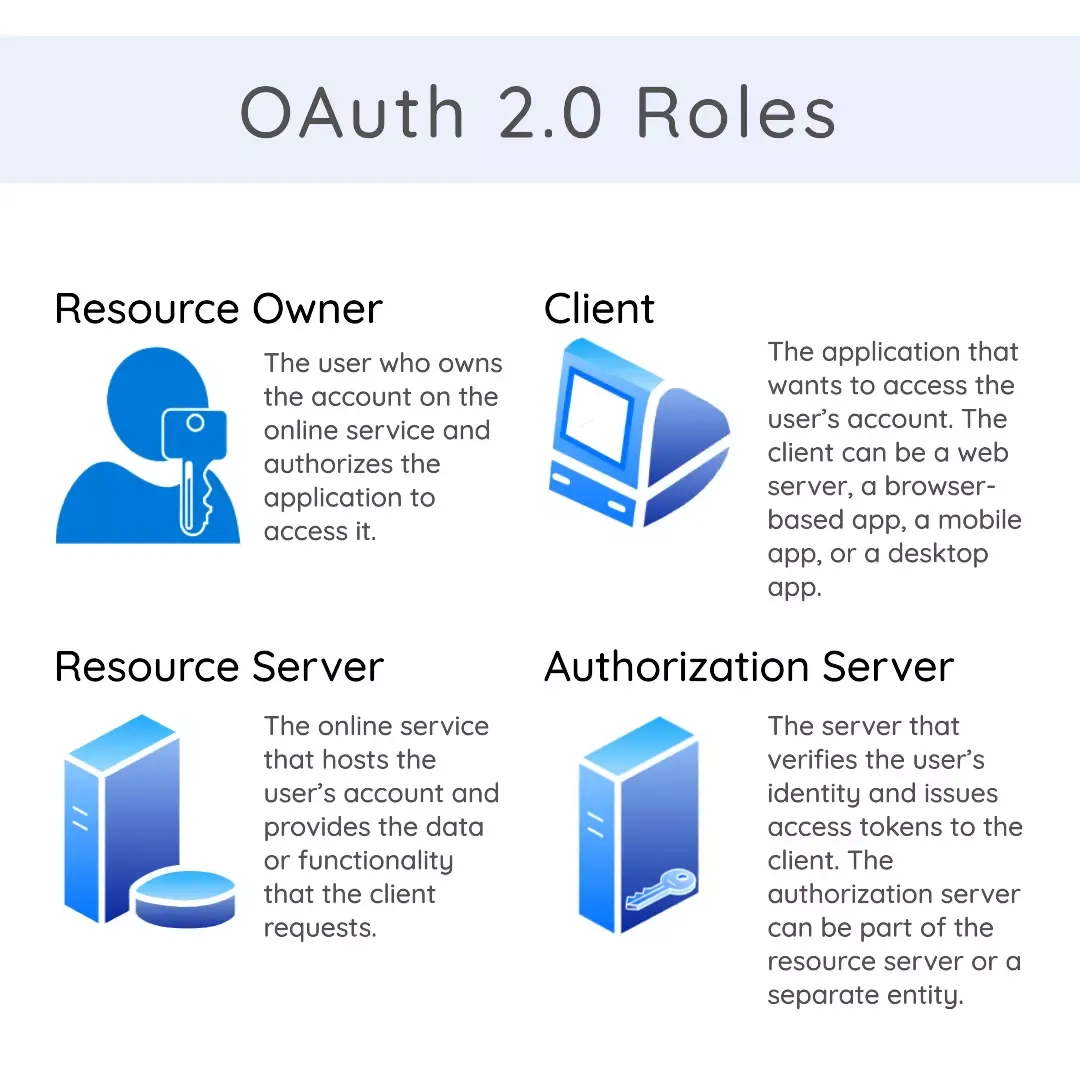
- Resource Owner: The user who owns the account on the online service and authorizes the application to access it.
- Client: The application that wants to access the user’s account. The client can be a web server, a browser-based app, a mobile app, or a desktop app.
- Resource Server: The online service that hosts the user’s account and provides the data or functionality that the client requests.
- Authorization Server: The server that verifies the user’s identity and issues access tokens to the client. The authorization server can be part of the resource server or a separate entity.
Grant Types
OAuth 2.0 includes several grant types. These are different ways an app can get permission to access something. The right one depends on what kind of app it is and how much the user trusts it:
- Authorization Code Grant
- Implicit Grant
- Resource Owner Password Credentials Grant
- Client Credentials Grant
- Device Code Grant
Authorization Code Grant
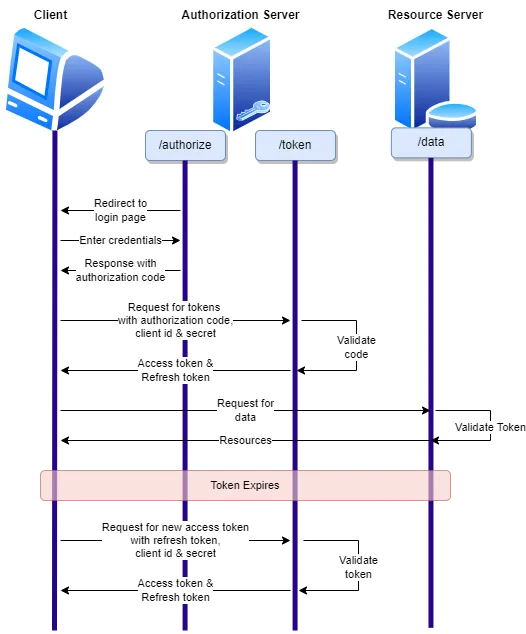
The Authorization Code Grant is the main flow in OAuth 2.0, made for web and mobile apps. Instead of giving an access token right away, it first gives an authorization code. The app then trades this code for a token in a separate step. This extra step adds security, because even if someone grabs the code, they can’t use it without the app’s secret. That’s why this method is best for apps that can keep secrets safe, like server-side apps.
Here are a few terms you’ll see in other grant types too: client credentials, tokens, and the authorization code. It’s helpful to understand them now.
Client Credentials
A pair of identifiers issued to an application when it registers with the authorization server:
- Client ID: A public identifier for the application, similar to a username.
- Client Secret: A private code, like a password. Along with the Client ID, it proves the app is real to the authorization server, so only trusted apps can get tokens.
Tokens
Digital credentials that represent specific permissions. There are two types:
- Access Token: A short-term pass that lets the app access your data. It only allows certain actions, like reading your profile or adding to your calendar. Anyone with this token can do those things, so it needs to be kept safe.
- Refresh Token: Lets the app get a new access token when the old one runs out, so you don’t have to log in again. It usually lasts longer than an access token and helps you avoid logging in too often.
Authorization Code
This is a short-lived code the app gets from the authorization server after you give permission. The app then trades it for an access token. This extra step keeps things secure, because the code alone can’t be used to get a token without the app’s credentials.
Steps
- The client redirects the resource owner to the authorization server’s login page, passing parameters such as the client ID, redirect URI, scope of access, and state.
- The resource owner enters their credentials and consents to the access request on the authorization server’s login page.
- The authorization server redirects the resource owner back to the client with an authorization code in the URL.
- The client exchanges the authorization code for an access token and a refresh token by sending a request to the authorization server’s token endpoint, along with its own credentials.
- The authorization server validates the request and responds with an access token and a refresh token.
- The client uses the access token to access the resource server’s protected resources on behalf of the resource owner.
- When the access token expires, the client requests a new one from the authorization server’s token endpoint, using its own credentials and the refresh token.
- The authorization server validates the request and responds with a new access token and a new refresh token.
Implicit Grant
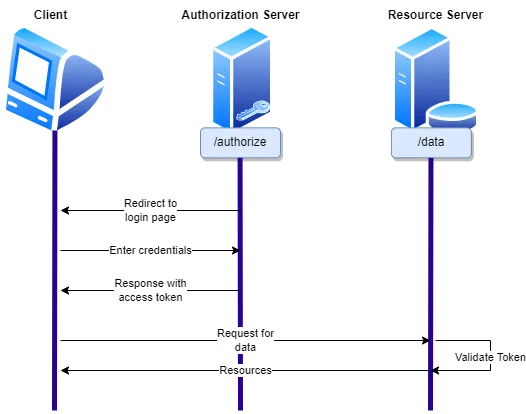
The Implicit Grant was made for apps that run only in your browser, with no server involved, like early single-page apps (SPAs). Instead of using two steps like the Authorization Code Grant, the server gives the access token right away, skipping the code step. This made things easier for apps that couldn’t keep secrets safe. But the downside is that giving the token directly to the browser makes it less secure, so this method isn’t used as much anymore because there are safer options.
Steps
- The client redirects the resource owner to the authorization server’s login page, passing parameters such as the client ID, redirect URI, scope of access, and state.
- The resource owner enters their credentials and consents to the access request on the authorization server’s login page.
- The authorization server redirects the resource owner back to the client with an access token in the URL fragment.
- The client extracts the access token from the URL fragment and uses it to access the resource server’s protected resources on behalf of the resource owner.
Resource Owner Password Credentials Grant
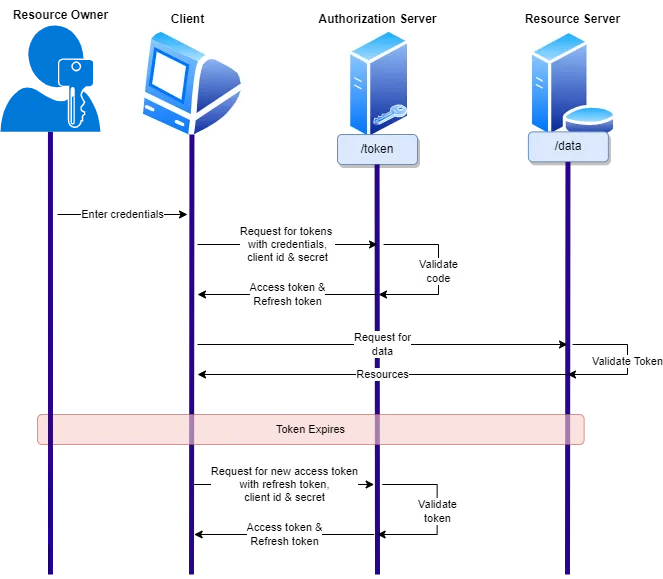
With the Resource Owner Password Credentials Grant (often called the “password” grant), you give your username and password straight to the app, which then swaps them for a token. This only makes sense if you really trust the app, like if you own or manage it yourself. It was mostly used in older systems moving to token-based security without a full rebuild. Today, it’s not recommended for new projects because handling passwords directly is risky and there are safer ways to do it.
Steps
- The client collects the resource owner’s username and password directly from them.
- The client sends a request to the authorization server’s token endpoint with its own credentials, the resource owner’s username and password, and the scope of access.
- The authorization server validates the request and responds with an access token and a refresh token.
- The client uses the access token to access the resource server’s protected resources on behalf of the resource owner.
- When the access token expires, the client requests a new one from the authorization server’s token endpoint, using its own credentials and the refresh token.
- The authorization server validates the request and responds with a new access token and a new refresh token.
Client Credentials Grant
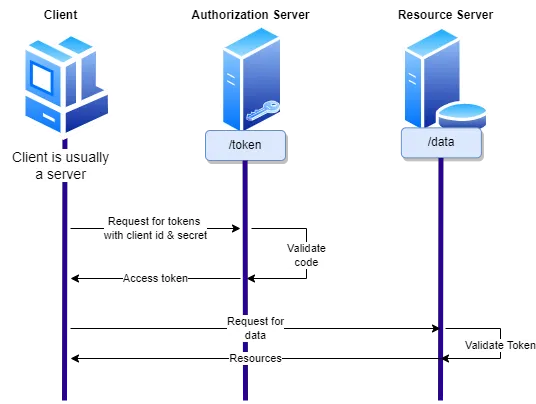
The Client Credentials Grant is different: the app isn’t acting for a user, but for itself. There’s no resource owner here. The app just proves who it is with its own credentials to get a token for its own use. This is common for server-to-server or machine-to-machine communication, where one backend service talks to another without any user involved. Since there’s no user, this method is only used when that’s exactly what’s needed.
Steps
- The client sends a request to the authorization server’s token endpoint with its own credentials and the scope of access.
- The authorization server validates the request and responds with an access token.
- The client uses the access token to access its own resources on the resource server.
Device Code Grant
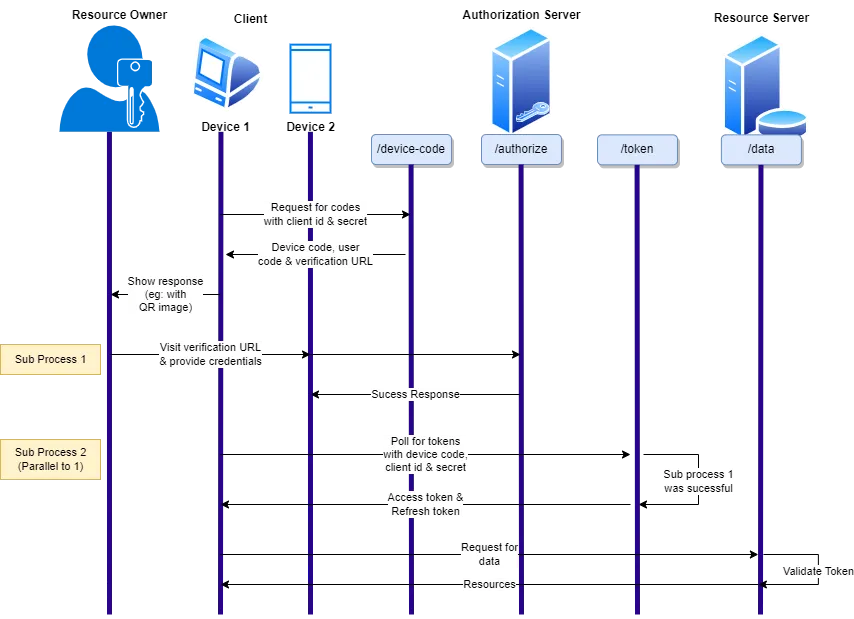
The Device Code Grant is made for devices where it’s hard to type a username and password, like smart TVs, game consoles, or IoT devices. Instead of typing on the device, you use another device, like your phone or computer, to log in. The app shows you a short code and a website link. You go to that link on your phone, enter the code, and log in there. This method is mainly used for devices that are hard to type on.
A few terms are specific to this flow:
- Device Code: A longer-lived code issued to the device itself, used behind the scenes for server-to-server polling.
- User Code: A short, easy-to-type code the user enters on the verification page.
- Verification URL: The page where the user enters the user code and confirms authorization, after which the device receives its access token.
Steps
- The device requests a device code and a user code from the authorization server’s device code endpoint, using its own credentials and the scope of access.
- The authorization server responds with a device code, a user code, a verification URL, an expiration time, and an interval time.
- The device displays or communicates the user code and the verification URL to the resource owner.
- The resource owner uses another device, such as a smartphone or a computer, to visit the verification URL and enter the user code.
- The resource owner enters their credentials and consents to the access request on the authorization server’s login page.
- The device polls the authorization server’s token endpoint at the interval specified, using its own credentials and the device code, until it receives an access token and a refresh token or an error response.
- The authorization server validates each poll request and responds with either a token pair, an error indicating the user hasn’t completed the flow yet, or an error indicating the device code or user code has expired or is invalid.
- The device uses the access token to access the resource server’s protected resources on behalf of the resource owner.
- When the access token expires, the device requests a new one from the authorization server’s token endpoint, using its own credentials and the refresh token.
- The authorization server validates the request and responds with a new access token and a new refresh token.
Benefits and Challenges
The main benefit of OAuth 2.0 is simple: apps get limited access to your data using tokens, and you never have to give them your real password. This token system works well for everything from small projects to big companies, which is why it’s so widely used. It also lets different apps and services work together easily, without each one needing its own way to share access.
The flexibility of OAuth 2.0 is great, but it also means it’s easy to make mistakes. Having different flows gives developers choices, but it can be harder to learn and easier to mess up. If a flow isn’t set up right, it can create real security risks. For example, the Implicit Grant can leak tokens if not handled carefully. Even though passwords aren’t shared, tokens still need to be created, stored, and sent safely, and that’s up to whoever builds the system.
Conclusion
OAuth 2.0 is a strong and flexible way for apps to access user accounts on different services safely, without ever needing a password. In this article, I’ve covered:
- The difference between authentication and authorization.
- The four roles involved in an OAuth 2.0 flow.
- The five grant types OAuth 2.0 supports, and the steps each one follows.
- Which grant type fits which kind of application, and why.
- The benefits OAuth 2.0 offers, and the trade-offs that come with them.
At its core, OAuth 2.0 is about one simple idea: instead of collecting and storing passwords, it lets users give apps access using tokens that only allow certain actions for a limited time. Every app has a standard way to ask for and use this access, no matter which flow it uses.
If you have any questions or feedback, feel free to leave a comment below. I’d love to hear from you.