Why Use Custom Tokens?
Firebase has a limited set of built-in authentication methods: email/password, phone number, Google, Facebook, and a few others. These options work for most cases. But sometimes you need to connect to something different, like an on-premises server, an LDAP directory, or another OAuth2 provider. This is where custom token authentication in Firebase comes in.
So why bother layering Firebase Authentication on top of an authentication system you already have? A few reasons come to mind:
- Firebase Authentication integrates easily with any GCP service.
- The Firebase Authentication client and admin SDKs are available in many languages, which makes them easy to work with, and they come packed with useful built-in features.
- You can support multiple sign-in methods for the same user. If someone needs to log in with either their email/password or their Google account, Firebase makes that easy.
- Merging two separate user accounts into one becomes straightforward.
How It Works
Before diving into the code, here’s a quick overview of how custom token authentication works, step by step:
- The client app sends the user’s credentials to your API endpoint.
- That endpoint uses the credentials to authenticate the client against the third-party auth server.
- If authentication succeeds, the endpoint uses a key that uniquely identifies the client to create a custom token with the Firebase Authentication Admin SDK.
- The endpoint sends the custom token back to the client, along with a success message.
- The client signs in with that token using the Firebase Authentication Client SDK.
Setting Up the Endpoint
I’ll use a Cloud Function as the backend server. If you’re new to Cloud Functions, you can find other articles on this blog or check out Google’s documentation. I recommend the Cloud Functions documentation from Firebase because it’s much easier to follow than the GCP Cloud Functions documentation.
For this demonstration, I’m using an HTTPS-triggered Cloud Function. The same approach also works for callable Cloud Functions with a few changes. Below is a simple function that responds with “Hello World” when called. All examples use TypeScript.
const functions = require('firebase-functions');
const express = require('express');
const cors = require('cors');
import {Request, Response} from 'express';

const app = express();
app.use(cors({origin: true}));

app.post('/', (req: Request, res: Response) => res.send("Hello World.\n"));

exports.api = functions.https.onRequest(app);
Test it with the following cURL command, replacing the endpoint with the one you get after deploying:
curl --location --request POST 'https://us-central1-fcode-blog.cloudfunctions.net/api'Generating the Custom Token
Before we can generate a custom token, we need something to authenticate against. To simulate a separate authentication server, I’ll write a simple async function called the mock auth system. It returns true if the given credentials are valid, and false otherwise.
const mockAuth = async (id: String, passcode: String) : Promise<boolean> => {
  await new Promise(resolve => setTimeout(resolve, 1000));
  return id === 'ABC-1234' && passcode === '123456';
}
The only valid user in this mock system has the ID ‘ABC-1234’ and passcode ‘123456’. Now we need to update the endpoint to:
- Accept the credentials
- Authenticate the client against the mock auth system
- Return the custom token
Here’s the updated endpoint definition:
Method: POST Content-Type: application/json Body Payload:
| Property Name | Type | Description |
|---|---|---|
| id | String | The ID the client is signing in with in the mock auth system |
| passcode | String | The passcode of the client’s mock auth account |
Response Payload:
| Property Name | Type | Description |
|---|---|---|
| id | String | The ID of the user who authenticated in the mock auth |
| customToken | String | Custom token that can be used to log into Firebase Auth |
You can generate a custom token with the Auth.createCustomToken(id) method, which requires an ID that uniquely identifies the user inside Firebase. The id from our mock auth system is already unique there, so to make it unique inside Firebase too, we’ll prefix it with MOCK-. That gives us MOCK-ABC-1234 as the ID used to create the custom token.
The following TypeScript code returns a custom token, as described above. It doesn’t do any validation or handle edge cases. This is just a straightforward example of what I explained.
app.post('/', async (req: Request, res: Response) => {
  const id : String = req.body['id'];
  const passcode : String = req.body['passcode'];
  const authenticated = await mockAuth(id, passcode);
  if (!authenticated) {
    return res.status(400).send({'msg': 'Invalid id or passcode'});
  }
  try {
    const token = await admin.auth().createCustomToken(`MOCK-${id}`);
    return res.status(200).send({
      'id': id,
      'customToken': token
    });
  } catch (e) {
    return res.status(500).send(`Unexpected error while generating custom token.\n${e}`);
  }
});
Since we’re using the Firebase Admin SDK, we also need to add the following lines before calling it for the first time:
const admin = require('firebase-admin');
if (admin.apps.length === 0) admin.initializeApp();
After deploying the updated function with npm run deploy, try the earlier cURL command again. You should see the ‘Invalid id or passcode’ message, as expected. Then use the following command to actually create a custom token:
curl --location --request POST 'https://us-central1-fcode-blog.cloudfunctions.net/api' \
--header 'Content-Type: application/json' \
--data-raw '{
    "id": "ABC-1234",
    "passcode": "123456"
}'
Running this, though, returns an error instead of the token you were expecting:
IAM Service Account Credentials API has not been used in project 217740369248 before, or it is disabled. Enable it by visiting the developer console and then retry. If you enabled this API recently, wait a few minutes for the action to propagate to our systems and retry.
Please refer to the Documentation on creating custom tokens for more details on how to use and troubleshoot this feature.
Service Account Configuration
This happens because the IAM Service Account Credentials API isn’t enabled for this project yet. That API is what signs the JSON Web Token (JWT), which is a piece of JSON containing claims that uniquely identify the user. Firebase’s JWTs follow the OpenID Connect JWT spec, so they include the fields defined there. The custom token generated by the Firebase Admin SDK is really just a signed JWT. This is why you need to enable this service for your project.
There are three ways to enable this service, all described in this documentation. Here, I’ll use the second method, which lets the Admin SDK automatically detect the service account. This is the most secure option and requires the least effort on your part. All three methods are secure on Google’s end, but the other two require a few extra security steps that the programmer needs to handle carefully.
Step 1: Enable the IAM Service
Click the link from the error message. This is the one I received. You can also get there manually by going to APIs & Services Library in the GCP console, then searching for IAM Service Account Credential API.
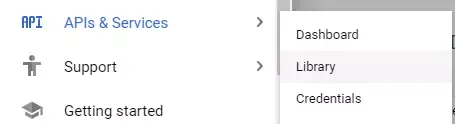
Click the Enable API button. It may take a few moments to take effect.
Step 2: Add the iam.serviceAccounts.signBlob Permission
Next, go to Access IAM in the GCP console.
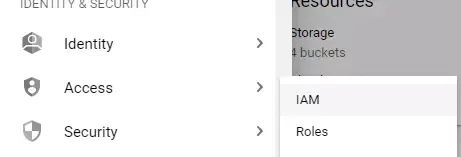
Locate the service account email in the format <project_id>@appspot.gserviceaccount.com, then click the edit icon next to it, on the right side of the table.

Click ”+ ADD ANOTHER ROLE” in the panel that appears, and select the “Service Account Token Creator” role. Once everything matches the screenshot below, click Save.
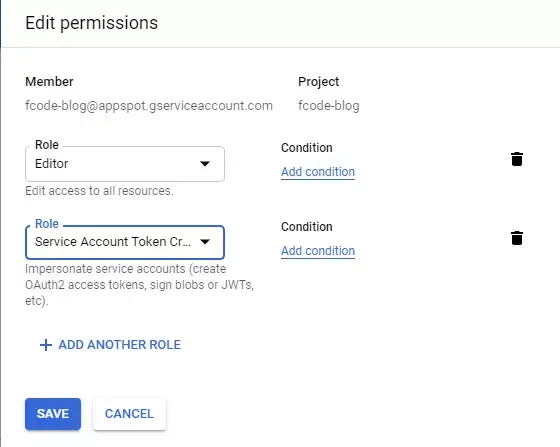
Give it about five minutes to propagate, then run the last cURL command again. This time you’ll get the custom token:
{
  "id": "ABC-1234",
  "customToken": "<CustomToken>"
}
You can now use this custom token to log into the Firebase Authentication server. The next few sections show how to do that from a handful of different clients.
REST Client
To use the Firebase REST API, you’ll need an API key. You can find it in the Firebase Console: go to Project Settings General, and under “Your Project” you’ll see a field labeled “Web API Key.” Copy that value, as it is your API key.
Use the following cURL command to log in, replacing [API_KEY] with the Web API Key you just copied, and [CUSTOM_TOKEN] with the token returned by the endpoint you built earlier:
curl --location --request POST 'https://identitytoolkit.googleapis.com/v1/accounts:signInWithCustomToken?key=[API_KEY]' \
--header 'Content-Type: application/json' \
--data-raw '{
    "token": "[CUSTOM_TOKEN]",
    "returnSecureToken": true
}'
This returns a JSON response, and you can use its values with other endpoints in the Firebase REST API.
Web Client
First, set up your web app to support Firebase; see the official documentation here. Then use the following code to sign in with the CUSTOM_TOKEN:
firebase.auth().signInWithCustomToken(CUSTOM_TOKEN)
  .then((userCredential)  =>  {
    // Signed in
    // ...
  })
  .catch((error)  =>  {
    var errorCode = error.code;
    var errorMessage = error.message;
    if (errorCode === 'auth/invalid-custom-token') {
      alert('The token you provided is not valid.');
    } else {
      console.error(error);
    }
  });
Flutter Client
First, set up your mobile or web app to support Firebase; see the official documentation here. Then use the following code to sign in with the CUSTOM_TOKEN:
FirebaseAuth.instance.signInWithCustomToken(CUSTOM_TOKEN)
  .then((userCredential) {
    // Signed in
    // ...
  })
  .catch((error) {
    print(error);
  });
Other Mobile Clients
For other platforms, first set up your project with Firebase, then use the appropriate API:
Conclusion
Custom token authentication is useful when you need to authenticate against a third-party system, such as an OAuth2 server, while still using all the features Firebase Authentication offers. I hope this covers everything you need to know about generating a custom token and using it on the client side. As always, feel free to leave a comment if you have questions.
I’ve also put together a gist with the full code:
Custom Token Authentication. This GitHub gist contains sample code for generating a custom token with the Firebase Admin SDK.