A linter is a tool that checks your code for errors, bugs, and style issues. In JavaScript and TypeScript projects, it’s mostly used to spot style mistakes and coding patterns that aren’t recommended by the community.
In this article, I’ll walk you through installing eslint, a popular linter for npm projects, and setting up Git hooks to prevent commits with lint errors. You’ll also learn how to use eslint with browser apps like ReactJS and backend apps like NodeJS.
Setting up ESLint
Before we start, ESLint now uses a new configuration system called flat config (eslint.config.js). This has been the default since ESLint 9, released in April 2024, and version 10 still uses it. So, this guide may look different from older ESLint tutorials. Also, make sure you have a recent version of Node.js, since ESLint 10 needs Node ^20.19.0, ^22.13.0, or 24+.
Because ESLint is only needed during development, not in production, install it as a dev dependency first.
npm i -D eslintThis command installs the latest version of eslint in your project. Next, you’ll need to set it up.
npx eslint --initThis command actually runs npm init @eslint/config in the background, so you would see the same setup wizard if you ran that command directly.
The wizard will ask you several questions. Use the up and down arrow keys to move between options and press Enter to choose. For multiple-choice questions, press the space bar to select options. I’ll explain each question below.
- How would you like to use ESLint? Choose the second option, “To check syntax and find problems,” and press Enter to continue. Older versions of this wizard had a third option for enforcing a style guide, which I’ll discuss later.
- What type of modules does your project use? Pick either JavaScript modules (import/export) or CommonJS (require/exports). If your code uses both, you’ll need to choose one. Do not select “None of these”.
- Which framework does your project use? If your project uses
ReactorVue.js, pick the right option. If not, choose “None of these”. - Does your project use TypeScript? If your project uses
TypeScript, select Yes. Otherwise, select No. - Where does your code run? For
ReactJSprojects, select Browser and unselect Node using the space bar. ForNodeJSbackend projects, select only Node and unselect Browser. If your repository has both backend and frontend code, select both and press Enter. - Would you like to install them now? Select Yes so the wizard installs
eslintand any other packages your answers require, such asglobals,@eslint/js,eslint-plugin-react, ortypescript-eslint. - Which package manager do you want to use? Choose
npmor whichever package manager you use.
That’s the entire wizard. There is no longer a format question. It always creates a single eslint.config.js file, or eslint.config.mjs if your package.json has "type": "module".
A note on style guides: Older versions of this wizard asked two additional questions here, “How would you like to define a style for your project?” followed by “Which style guide do you want to follow?”, allowing you to bolt on a prebuilt style guide such as Airbnb’s, Standard’s, or Google’s. In 2024, both questions were taken out of the wizard, making things a bit simpler and easier for everyone.
If you were specifically after Google’s style guide:
eslint-config-googlewas archived by Google in June 2026 and never picked up flat config support, so it’s not a good choice for a new project anymore. For most projects today, the simpler path is to stick with the rules ESLint installs by default and let a separate tool, Prettier, own formatting, pair it witheslint-config-prettierso the two don’t fight over formatting rules. If you’d still like an opinionated style guide on top of that, search “eslint-config” on npmjs.com and check that the README shows a flat-config (eslint.config.js) example before adopting it; that’s your signal it’s actually been updated for modern ESLint.
Once ESLint is set up, add these scripts to your package.json.
"scripts": {
  "lint": "eslint .",
  "lint:fix": "eslint . --fix",
  // Other scripts
},
The first script finds problems in your code and shows you the line numbers. If you get an error, you can look up the message online to learn why the rule matters and how to fix it. For simple issues, just run the second command to fix them automatically.
Setting up git hooks
As mentioned earlier, you can use git hooks to prevent commits with lint errors. First, install the dependencies.
npm i -D husky lint-stagedHusky’s setup process has changed as well. Versions before v5 stored hook configuration in package.json, but that method is no longer used. Now, the current version manages hooks as files inside a .husky/ folder. Run:
npx husky initThis command creates a .husky/pre-commit file with a placeholder command and adds a "prepare": "husky" script to package.json. This way, your teammates get the hooks set up automatically when they run npm install. Open .husky/pre-commit and replace its contents with:
npx lint-stagedThen add the lint-staged configuration to your package.json.
"scripts": {
  "lint": "eslint .",
  "lint:fix": "eslint . --fix",
  "prepare": "husky",
  // Other scripts
},
"lint-staged": {
  "*.js": [
    "eslint --fix"
  ]
},
For TypeScript projects, change "*.js" to "*.ts" in the lint-staged section. If your project uses both, use "*.{js,ts}".
There is no need for a git add step anymore. Since version 10, lint-staged automatically re-stages any files it fixes. If it finds a leftover git add command in your config, it will show a warning. This is a sign you may have copied the step from an older tutorial.
Setting up WebStorm
If you use WebStorm as your IDE, you can see ESLint errors directly in the editor without running the npm run lint script yourself.
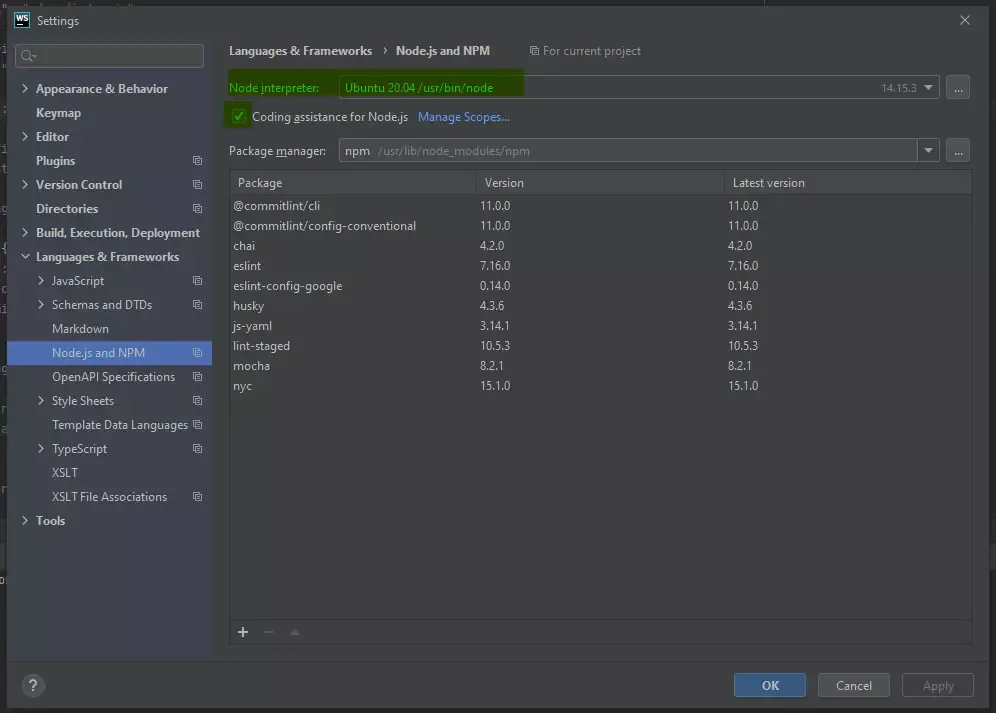
Go to Settings Languages & Frameworks JavaScript Runtime, and make sure Node.js is selected as the preferred runtime and points to the Node.js installation for your project. This settings page was previously called “Node.js and NPM” but was renamed when WebStorm added support for other runtimes like Bun and Deno. If you can’t find it under the old name, look for the new one.
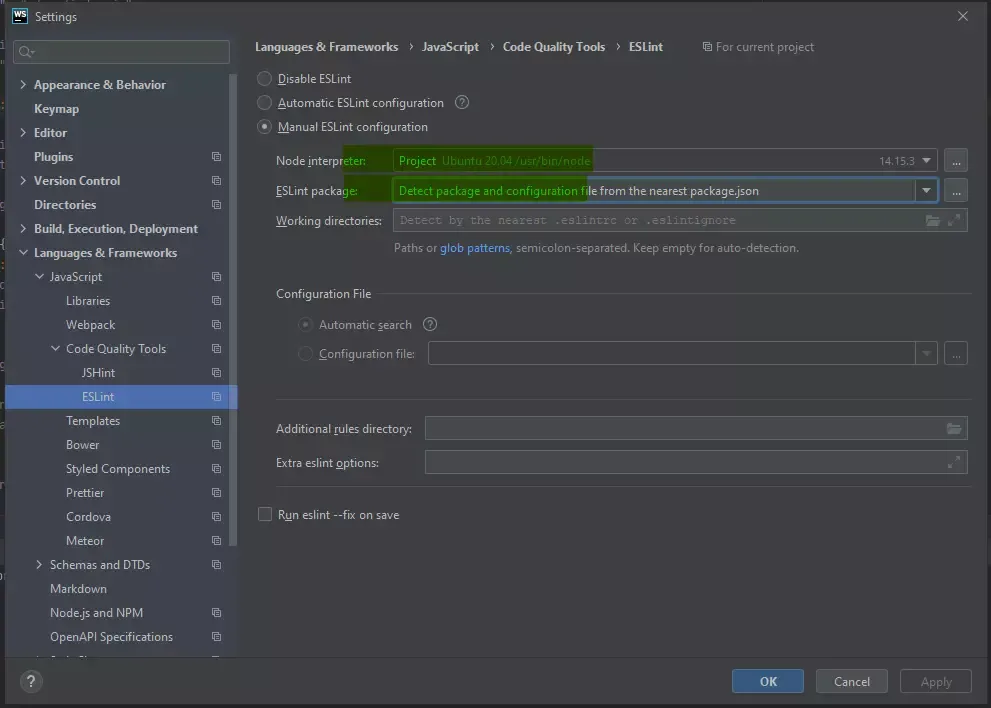
Next, go to Languages & Frameworks JavaScript Code Quality Tools ESLint. By default, WebStorm can configure ESLint for you automatically, which is usually the best option since it detects the eslint package and config file on its own. If you want more control, switch to Manual ESLint configuration and set the ESLint package field to the copy in your project’s node_modules.
Conclusion
ESLint is a popular tool for finding and reporting patterns in JavaScript code. It helps make your code more consistent and helps you avoid bugs. To learn more, check out the official documentation. You can also see all the lint rules here, with explanations, sample code, and tips for fixing issues.
In this article, I explained how to set up ESLint with the new flat config system, git hooks, and WebStorm integration. I hope this guide was helpful. Feel free to share your thoughts and ideas.
Happy coding!